Programming Excel
This web page is a very basic introduction to writing programs (code) for Excel. It assumes no prior programming knowledge. These programs extend Excel's capabilities and allow you to automate repetitive tasks. You can put controls such as command buttons and scroll bars on a spreadsheet to start the programs and affect how they work.
Many of the techniques described here are used in the Excel resources for my books. You can save yourself some typing and download the spreadsheet that gets created in this web page.
Contents of this page
- Displaying The Developer Tab
- Inserting and Designing Controls
- Introducing The Visual Basic Editor
- Writing Code
- Debugging the Code
- Macros, Subroutines, and Functions
- The Scope of Variables
- The Scope of Procedures
Displaying The Developer Tab
Most people never do any programming, so by default the program development features are hidden. Therefore, the first thing we must do is add the Developer tab to Excel's ribbon. This tab gives access to the various programming tools.
Click on Excel's File tab and then click on Options (at the bottom, left), and then on Customize Ribbon (also on the left). The following dialog box opens:

Check the Developer check box and then click OK to close the dialog box. Now, back in Excel the Developer tab (circled in blue) appears and looks like this:

We will mainly use the four buttons circled in red:
- Insert: This button is used to select controls to insert into the spreadsheet.
- Properties: This button opens the Properties Window, which is where we set the details of each control such as size, location, color, etc.
- Design Mode: Once the controls are designed, clicking this toggle switch makes them “live” (i.e., it allows us to run them, rather than design them).
- Visual Basic: Without code the controls exist, but they don't do anything. To make them do something useful we need to write code for them. This button opens the Visual Basic Editor (VBE) where we write and test the code. The coding language is called Visual Basic for Applications (VBA), or VB for short.
Inserting and Designing Controls
The following example shows how to insert controls into a spreadsheet and how to customize their appearance.
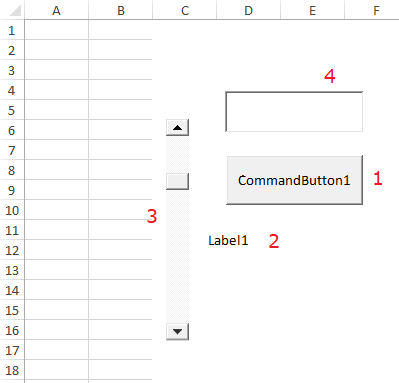
Example 1: We will insert four controls: (1) a command button, (2) a label, (3) a scrollbar, and (4) a text box. To do this, click on the Insert button and select controls from among the ActiveX controls. (You can hover your mouse over the controls to see pop-ups identifying them.)
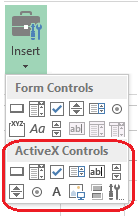
Start by selecting the Command Button. Now move your mouse to the spreadsheet and click and drag diagonally where you want the button to appear. Do the same with the other 3 controls. Move and size your controls so your spreadsheet looks something like this:
Now we will customize our controls. Click on the Properties button to open the Properties Window and either click on a control in the spreadsheet or choose a control from the dropdown list (circled) to change its properties.
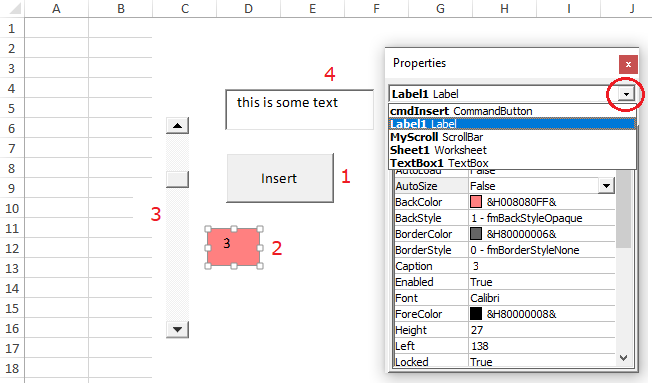
Change these properties to the values stated:
- The command button: Name: cmdInsert, Caption: Insert
- The scrollbar: Name: MyScroll, Min: 1, Max: 10, Value: 3
- The label: BackColor: make this pink (anything other than white),
Caption: 3 (to match the initial value of the scrollbar) - The textbox: Text: this is some text
Now click the Design Mode toggle to get out of design mode. Notice that the buttons are now “live”. You can click on the command button, you can slide the scrollbar and you can type text into the textbox, but without code, that is about it. (You can toggle the Design Mode button on again at any time if you want to make any more design changes.)
Now we are ready to start writing some code!
Introducing the Visual Basic Editor
Note: This is a good time to save your spreadsheet. Excel demands that you save it as a macro-enabled type file (with the extension .xlsm). This is because Excel programs can do potentially dangerous things like create and delete files. Thus you should only open .xlsm files from a trusted source. Hopefully, you include me in that group!
Click the Visual Basic button. This opens the Visual Basic Editor. You will find it useful to put the VB Editor and the spreadsheet side-by-side, as shown in the picture below.
The VB Editor contains all the tools that we need to write code. Thus it is called an integrated development environment (IDE). To become familiar with it let's do 6 things. Refer to the numbers shown in the picture below:
- In the spreadsheet, give the worksheet named “Sheet 1” the new name “e.g.1” by right-clicking on its tab and choosing Rename. Also add a second worksheet by clicking on the New Sheet button ⨁ to the right of the existing tab.
- In the VB Editor, notice that the Project Explorer has updated to include the new name and new sheet. (Type ctrl-R if the Project Explorer is not visible.)
- In the VB Editor, click on the Insert menu item and insert a Module. Certain types of code must go into modules.
- Notice that the Project Explorer now shows the new module as well.
- In preparation for the next step, make sure that you are in Design Mode and that you are looking at the worksheet that has the four controls.
- In the spreadsheet, double-click each of the four controls. In the VB Editor's Code Panel, notice how a stub (an empty wrapper for yet-to-be-written code) appears for each of the four controls.

The VB Editor has already written some code for us! We just need to add code inside each stub to make the control do exactly what we want.
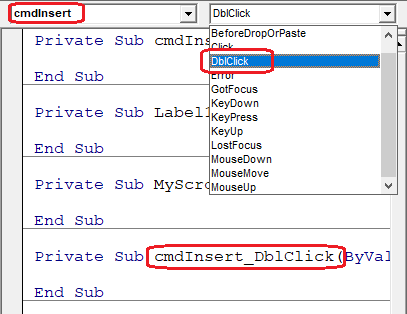
Each of these four “packages” of code is called an event handler. Windows works like this: if the user clicks on the button called cmdInsert, then the click event for that button is said to have occurred, and any code that we have put inside the stub named cmdInsert_Click is executed.
Now, suppose that we also want something else to happen if the user double-clicks the button. Then we also need to write code for that event. The VB Editor will create the appropriate stub for us if we select the appropriate control and the appropriate event from the two dropdown lists, like this:
Finally, if we know the correct syntax, then we could just type all the code, including the stubs, directly into the code panel. But that is the hard way and nobody does it that way.
At first, the many Project locations where you can place code (Sheet1, Sheet2, ThisWorkbook, Module1) will be a bit confusing. If you forget, just look at the title at the top of the VB Editor to see which location you are currently working in:
Now it's time to write some code!
Writing Code
Some Absolute Basics of the Visual Basic Language
To really learn how to program in Visual Basic, you should read one of the many excellent books available on the subject. I am only going to explain enough so that we can understand Example 2 below.
- The syntax
A = 3.14means that variable A is assigned the value 3.14. Similarly,A = Bmeans that variable A is given the value of variable B. - The syntax
MyScroll.Valuemeans that MyScroll is a control or other type of object, and that Value is one of its properties. - The syntax
Dim N As Integer, S As Stringmeans that we are dimensioning or reserving space in computer memory for a variable with the name N that will hold an integer, and also reserving space for a variable named S that will hold a string of characters (i.e. text). - The syntax
Cells(1, 2) = 3.14means that the spreadsheet cell in row 1 and column 2 is given the value 3.14. LikewiseCells(1, 2) = "Hello world!"means that the quoted text is inserted in that cell. (Remember that the cells of a spreadsheet can hold numbers or text.) - An apostrophe denotes the beginning of a comment. For example:
Area = Base * Height / 2 'this is the area-of-a-triangle formula
In the gray box of code below we have used comments to give each line of code a number so that we can refer to it.
Example 2: (Example 1 continued.) We will write code to perform these two tasks:
- When the user slides the scrollbar, the label will display a number n between 1 and 10, depending on the value of the scrollbar.
- When the user clicks the cmdInsert button, the contents of the text box will be inserted into the spreadsheet cell in row n and column 1 (or A).
The first task requires the MyScroll_Change event handler and the second task requires the cmdInsert_Click event handler, so we can start by deleting the other two event handlers.
Next, start filling in the two remaining stubs with the following code:
Private Sub MyScroll_Change()           '1
   Label1.Caption = MyScroll.Value      '2
End Sub                                 '3
                                        '4
Private Sub cmdInsert_Click()           '5
   Dim N As Integer, S As String        '6
                                        '7
   N = MyScroll.Value                   '8
   S = TextBox1.Text                    '9
   Cells(N, 1) = S                      '10
End Sub                                 '11
You should actually do the typing! You will notice several things happen as you type, that collectively are called IntelliSense.
The first line that you type will be Label1.Caption = MyScroll.Value.
As soon as you type the period after Label1, a list pops up showing the properties
that Label1 has (i.e. it shows how you could complete this bit of code).
Press the Tab key or Double-click to make your choice.

The next line that you type will be Dim N As Integer, S As String.
As soon as you type the word as, a list pops up showing what
type of variable N could be. If you continue typing int then the list
gets narrowed down.
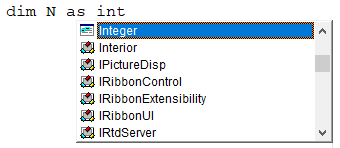
The last line that you type will be Cells(N, 1) = S.
As soon as you type in the opening bracket a code hint pops up showing
in bold that you now need to type in a row number.
After you do that and type the comma another code hint pops up showing in bold that you now need a column number.
Another thing that IntelliSense does is make your code neat and consistent. For example:
- Keywords (words with a defined meaning) such as Private, Sub, Dim, Integer, String, Value, Text, Cells, End are capitalized.
- Spacing is made consistent (exactly one space before and one space after an = sign, etc.)
- If you indent a line of code, all the following lines that you type are automatically indented. You can indent an entire block of code at once by selecting it and pressing Tab. Likewise you can outdent the block by pressing Shift + Tab. Indentation is a very important visual cue to help organize code.
Running the Code
Okay, let's run the code. In the spreadsheet's Designer tab toggle the Design Mode button off. Now click your cmdInsert botton (the one that you created with the name cmdInsert and the caption Insert) and notice that the text in the textbox is copied to the cell stated in the pink label. Now move the scrollbar and notice that the label changes. Click the cmdInsert button again and notice that now the text is copied to whatever cell is now stated in the label. This is the way the code is supposed to work.
Debugging the Code
The first time you run your code, it may not work the way you intended. It may contain errors (bugs). Debugging is the process of finding and fixing them. The IDE has many features to help with debugging.
Let's start by adding the Debug Toolbar to the VB Editor's tools. Do this by right-clicking in the toolbar area and checking the Debug checkbox. The Debug toolbar appears and you can drag the 4-dots icon (circled) to move the toolbar anywhere you want.

The most important tools are the four circled ones, called Run, Reset, Step Into, and Immediate Window. Example 3 shows how they work together.
Example 3: (Example 2 continued) Using the debugging tools we will step though the code and see exactly which lines are executing when we click the button or slide the scrollbar. Do the following:
- In the code panel of the VB Editor, click in the gray margin beside lines 1 and 5.
This creates two break points denoted by red dots.
(When the code is executing, a break point is a point where the execution will stop. This gives us a chance to check the values of variables, etc. Then we can restart execution with the Run button, or we can step through one line of code at a time with the Step Into button, or we can just quit with the Reset button.) - In the spreadsheet click your cmdInsert button. In the VB Editor notice that line 5 has turned yellow. This indicates that line 5 will be executed next. (Remember that line 5 is the beginning of the event handler for the click event of the cmdInsert button.)

- Use the Step Into button repeatedly to step through the code one line at a time. Stop when line 10 is yellow. Line 10 is the one that puts text into a cell into the spreadsheet.
- Press Step Into one more time and watch this actually happen. Amazing, hey?!
- Finish off by pressing the Run button, the Reset button or the Step Into button one more time to fall out of the subroutine.
Just knowing which lines of code are being executed is valuable, especially if your code contains loops and branches. But how can we check the values of variables and other objects?
Example 4: (Example 3 continued) Let's step through the code again and examine the values of the various variables. Do the following:
- Click the Reset button in the Debug toolbar. (This should not be necessary if you did step 5 in the previous example. This example makes more sense if we start “afresh”.)
- In the spreadsheet click your cmdInsert button. In the VB Editor line 5 turns yellow.
- Hover your mouse over the words N, S, MyScroll.Value, TextBox1.Text, and Cells everywhere they appear in lines 5 to 11 of the code. Pop-ups appear showing their values.

- Notice that N and S have not been assigned values yet. (By default, numbers
are initially zero and strings are initially empty (there is nothing inside the
quotation marks)).
The scrollbar's value and the textbox's text already have the values that we gave them when we designed the controls.
Asking the spreadsheet cell's value causes an error because right now N = 0 and there is no row 0 in a spreadsheet. - Click the Step button to advance one line at a time and recheck the values. Verify that N and S eventually get the values that they should.
- Before we fall out of the subroutine, let's open the Immediate Window by clicking its button in the Debug toolbar.
- The Immediate Window is a Command Line Interpreter (this means that
we can type in a line, it interprets our line and does something).
I use it often when I have to create a complicated line of code.
It lets me experiment until I get the sytax right. Then I copy it into the code panel.
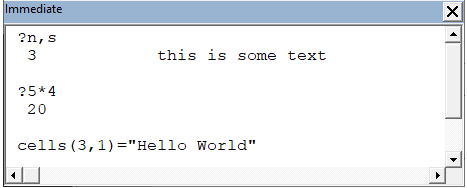
Below, we have done 3 things in the Immediate Window:
- Asked it what are the values of N and S?
- Asked it what is 5 times 4?
- Told it to change the contents of spreadsheet cell A3 to the text "Hello World".
Macros, Subroutines, and Functions
Besides event handlers here are 3 other kinds of “packages” of code: macros, subroutines and functions.
First an analogy: consider a coffeemaker. It is a “package” of machinery and electronics with internal workings that we (coffee drinkers) never have to think about. All that concerns us is that it has inputs (water, coffee beans, electricity), performs a task (makes coffee), and has outputs (a pot of coffee).
Similarly, macros, subs and functions are all packages of code. Once a programmer has written a macro, sub, or function, other programmers can use it without having to concern themselves with the internal details. All they have to know is what task it performs and what the inputs and outputs are. This ability to hide details greatly reduces complexity. There is a lot of overlap but generally:
- A macro is a sequence of keystrokes and mouse actions that has been recorded and saved as a package of Visual Basic code. Macros are typically used to replace repetitive tasks.
- A subroutine (or sub) is a package of VB code that performs a specific task. It can have any combination of inputs and outputs.
- A function is similar to a subroutine, except that it is used when one output value is required.
Let's start by looking at an example of a macro.

Example 5. Macro: Let's record, debug and run a simple macro. Do the following:
- Recording the macro: In the spreadsheet, click on the Developer tab, and in the Code group, click on Record Macro.
- Click on cell B2.
- In the Home tab, use the tools in the Font group to make the fill color yellow, the font color red, and the font style bold.
- Then type "=2+3" into the cell (without the quotation marks) and press Enter.
- In the Developer tab, click on Stop Recording.
- Now look at the VB Editor window's Project Explorer and notice that a new module has appeared, namely Module2. Double-click on it and notice that the following code was recorded in a subroutine called Macro1:
Sub Macro1()                                      '1
'
' Macro1 Macro -  generated by Macro recorder
'
    Range("B2").Select                            '2
    With Selection.Interior                       '3
        .Pattern = xlSolid                        '4
        .PatternColorIndex = xlAutomatic          '5
        .Color = 65535                            '6
        .TintAndShade = 0                         '7
        .PatternTintAndShade = 0                  '8
    End With                                      '9
    With Selection.Font                           '10
        .Color = -16776961                        '11
        .TintAndShade = 0                         '12
    End With                                      '13
    Selection.Font.Bold = True                    '14
    ActiveCell.FormulaR1C1 = "=2+3"               '15
    Range("B3").Select                            '16
End Sub                                           '17
- Debugging the macro: In step 8 we will step through the macro. But to properly see what is happening, we should reset cell B2 to its original formatting. The quickest way to do this is to drag-and-drop a neighboring cell on top of it.
- To step through the macro, click the mouse anywhere in the macro and then click the Step Into button on the Debug toolbar. With the VB Editor and the spreadsheet side-by-side you can see each line of code take effect.
- Running the macro: Again, first reset cell B2 as in step 7.
- In the spreadsheet's Developer tab, Code group click the Macro button. The following dialog box opens. Select Macro1 and click Run.

Some notes on the code produced by the macro recorder:
- Much of the code is useless. For example line 2 is there only because we selected cell B2 to start formatting and line 16 is there only because we pressed the Enter key. Both lines are probably not what we want.
- Likewise, lines 4, 5, 7, 8 and 12 refer to pattern and tint properties that we didn't ask for. We can delete them.
- The With and End With statements (lines 3, 9, 10, 13) are part of the Visual Basic programming language and are meant to provide a shortcut when referring to many properties of the same object. If there aren't that many then we don't really need them. Lines 10 to 13, for example, could be replaced with:
Selection.Font.Color = -16776961
Selection.Font.TintAndShade = 0
- Whenever the user selects a range of cells on the spreadsheet (or the code selects them with the Select method as in lines 2 and 16), we can refer to the selection in code as the Selection object. This is why the word Selection appears in lines 3, 10, and 14.
- In conclusion, the macro recording provides us with a good starting point. But here are two possible subroutines that would do a better job than this macro.
Sub SimilarToMacro1()
'Use this if you only want to format cell B2.
   Cells(2, 2).Interior.Color = 65535
   Cells(2, 2).Font.Color = -16776961
   Cells(2, 2).Font.Bold = True
   Cells(2, 2) = "=2+3"
End Sub

Sub AlsoSimilarToMacro1()
'Use this if you want to format a selection.
   Selection.Interior.Color = 65535
   Selection.Font.Color = -16776961
   Selection.Font.Bold = True
   Selection = "=2+3"
End Sub

Now that we know about macros, let's turn to subroutines and functions. The picture to the right compares the stubs for a macro, a subroutine and a function.
Notice that the subroutine is just a macro with a list of arguments in the brackets after the subroutine's name. Each argument is an input or output variable. Arguments are the point of communication between the code that calls the subroutine and the code inside the subroutine.
The function is based on the idea of a function in algebra,
which has an argument (or input) and a value (or output).
Notice that the stub for the function is similar to that of a subroutine,
except that (generally) all the arguments are inputs. The output is
created by the (generally) last statement inside the function,
SomeFunction = ...
Example 6. Subroutine: A good example of a task where a subroutine is the right tool for the job is converting from polar to rectangular coordinates in 2D geometry. Two numbers are input and two numbers are output. Copy the following code into Module1.
Sub PtoRCaller()                     '1
   R = 5                             '2
   T = 60                            '3
   Call PtoR(R, T, X, Y)             '4
   Debug.Print X, Y                  '5
End Sub                              '6

Sub PtoR(R, Theta, X, Y)             '7
   'input: the polar coords R and Theta (in degrees)
   'output: the rectangular coords X and Y
   Const Pi = 3.14159265358979       '8

   ThetaInRads = Theta * Pi / 180    '9

   X = R * Cos(ThetaInRads)          '10
   Y = R * Sin(ThetaInRads)          '11
End Sub                              '12
Subroutine PtoRCaller (lines 1 to 6) calls subroutine PtoR using the Call statement (line 4). Subroutine PtoR (lines 7 to 12) does the actual polar to rectangular conversion. (Compare this Call to the way we ran the macro above.)
Let's step through the code to see how it works.
- Click your mouse anywhere in sub PtoRCaller to select it, and then start clicking the Step Into button on the Debug toolbar.
- Stop when line 4 is highlighted. (Remember that the highlighted line is waiting to be executed. It has not been executed yet.) Hover your mouse over the arguments. Note that R and T have values but X and Y are empty.
- Click Step Into once more and notice that the Call statement has transferred control to subroutine PtoR. Notice also that inside PtoR the variable T is known as Theta.
- Click Step Into once more and notice that line 8 is skipped. This is because that line defines a constant and is not an executable line.
- Keep stepping. Line 9 converts Theta from degrees to radians.
- Lines 10 and 11 compute the values of X and Y. Note that
they use the Sin and Cos functions, which are built into the Visual Basic
programming language.
Lines 10 and 11 give us a preview of the syntax for using functions in VB. Functions are not called with a Call statement. Rather, they return a value so they can be inserted right in a line of code, just like a variable or number. - When line 12 is highlighted, notice that X and Y now have values and we are ready to return to the calling routine.
- Click Step Into and notice that we are back in the calling routine at the line after the Call statement.
- Line 5 prints the values of X and Y in the Immediate window.
- Click Reset, Run or Step Into to finish up.
Example 7. Function: A good example of a task where a function is the right tool for the job is converting temperatures from fahrenheit to celsius or vice versa. Add the following code to Module1.
Function DegFtoC(DegF)
   'convert degrees fahrenheit to degrees celsius
   'test by typing =DegFtoC(212) into a cell
   DegFtoC = (DegF - 32) * 100 / 180
End Function

Function DegCtoF(DegC)
   'convert degrees celsius to degrees fahrenheit
   'test by typing =DegCtoF(100) into a cell
   DegCtoF = DegC * 180 / 100 + 32
End Function
Let's step through the code to see how it works.
- Put a break point on the first line of code,
Function DegFtoC(DegF). - In Sheet2 of the spreadsheet, select cell A1 and start typing
=DegFtoC(212). Notice that IntelliSense knows that the function exists and helps us complete the code. - When we press Enter, the breakpoint in the code is highlighted and we can step through the code to test it, as usual. When execution has finished, the value of the function appears in the spreadsheet cell.
- Remove the breakpoint.
- Here are several more functions you can try. On the left we show the formula and on the right we show the value. Notice that in row 3, the PI function that returns the value of π has no arguments. In row 4 the ASIN function is the arcsin or sin−1 function. In row 5 the financial function, PMT, has 4 arguments. It returns the amount that a person has to pay each year to pay off a $100,000 mortgage in 10 years if the interest rate is 10%. (Notice that if there was no interest they would pay $10,000 per year. Instead they are paying $16,274.54 per year. Ouch!)

- If you want to use any of these formulas in code, just omit the = sign.
The Scope of Variables
This section gives a brief introduction to the concept of scope. An excellent article that goes into more depth is visual-basic-beginners-guide.blogspot.com.
The scope of a variable is defined as the parts of our code that are aware of the variable's existence.
Remember the coffeemaker analogy. The internal parts of the coffee maker such as the boiler and circuit board are not of interest to the coffee drinker and are hidden inside it. Similarly, controlling the scope of variables helps us hide complexity and makes computer code easier to understand.
There are three basic scope rules for variables:
- If we declare a variable inside a procedure (i.e. inside a subroutine, function, macro or event handler), then only the code inside the procedure can access or change the value of that variable. We say that the variable's scope is local to that procedure.
- If we declare a variable outside of a procedure, then the code inside the procedure can access it only if it is on the procedure's argument list.
- It is sometimes useful to override rule 2. If we declare a variable at the module level then it is global (i.e. its value is available to all procedures in the module in which it is declared, or even to all procedures in all modules in a project.)
What do we mean by declare? Declare means to use a Dim statement, Public statement, or Private statement to tell Visual Basic that we want to reserve space in computer memory to hold a variable with a given name, type and scope.
We have only seen one example of a declaration so far (line 6 of the code in Example 2). That is because VB is a loosely typed language and doesn't actually require us to declare anything. This has been okay so far only because our code has been so simple. So how do we declare a variable?
- To declare a variable inside a procedure (and hence make it local) we use the Dim statement. It is customary to put all the declarations for the procedure at the beginning of the procedure.
- To declare a variable at the module level (and hence make it global) we use either the Private statement or the Public statement – Private if we want the variable to be available to all the procedures in the module in which it is declared, and Public if we want it to be available to all the procedures in the entire project. These declarations must be put at the very beginning of the module, before the code for any procedures.
Example 8. Local variables: This example illustrates scope rules 1 and 2. Create a new module (Module3) and paste this code into it.
Sub Caller()                           '1
   Dim X As Integer, Y As Integer      '2
   X = 1                               '3
   Debug.Print "X,Y before", X, Y      '4
   Call MySub                          '5
   Debug.Print "X,Y after", X, Y       '6
End Sub                                '7

Sub MySub()                            '8
   Dim X As Integer, Y As Integer      '9
   Y = 2                               '10
   Debug.Print "X,Y in MySub", X, Y    '11
End Sub                                '12
Notice that variables X and Y are declared locally in both subroutines (lines 2 and 9). Notice also, that subroutine Caller calls subroutine MySub in line 5, but with no arguments, so no values are passed between the subroutines that way. We want to show that there is no relationship between the X's and Y's in the two routines. To do this, refer to the picture below and carry out the following steps.
- If it isn't already open, open the Immediate window and clear its contents.
- Open the Locals window by clicking the Locals Window button in the Debug Toolbar (circled in green in the picture). This window provides a convenient way to see all locally declared variables.
- Now we are ready to start stepping through the code. Click anywhere in the Caller subroutine and then click the Step Into button.
- Look at the Locals window. Its title reads
VBAProject.Module3.Callermeaning that we are looking at the local variables of the Caller procedure. Those variables are X and Y and they have values of zero. This is because they were declared as integers, which are always initialized with the value zero. - Take a couple more steps until line 8 is highlighted. At this point the Caller
routine has passed control to MySub. Again look at the Locals window. Its title now reads
VBAProject.Module3.MySuband it shows that MySub's locals, X and Y, exist and have initial values of zero. (If we hover the mouse over X and Y in in the Caller routine, the pop-ups show that they are different variables with different values than the X and Y in MySub.) - Take a couple more steps until line 7 is highlighted. Execution is about to end. This is when the screenshot below was taken. Note that, in the Immediate window, the first and third lines show the variables local to Caller printed and the second line shows the variables local to MySub printed.

Conclusion: The scope of a variable that is declared inside a procedure is local (i.e. the scope is the inside of the procedure). Often many programmers work together on a big project. Scope rules 1 and 2 mean that different procedures can be written by different programmers and they can use the same variable names without having to worry that the variables will interfere with each other.
Example 9: Global variables: This example illustrates scope rule 3. Refer to the picture below and carry out the following steps.
- Modify the code from the previous example by deleting the declarations inside
the procedures (lines 2 and 9) and inserting the module level declaration:
Public X As Integer, Y As Integer
at the very beginning of the module. (The final code is in the picture below.) Now there is only one version of X and Y, and it has global scope. - If they aren't already open, open the Immediate and Locals windows and clear the Immediate window's contents.
- Now we are ready to start stepping through the code. Click anywhere in the Caller subroutine and then click the Step Into button.
- Look at the Locals window. It doesn't show any local variables for Caller because there aren't any, but if we click the ⊞ button (circled in red in the picture) to expand the tree, then we see the global variables, X and Y.
- Take a couple more steps until line 8 is highlighted. At this point control has passed to MySub. Again, it doesn't show any local variables for MySub and we must click the ⊞ button to see the globals, X and Y.
- Take a couple more steps until line 7 is highlighted. Execution is about to end. This is when the screenshot below was taken. We see that both procedures had access to the global variables and each procedure changed one of them.
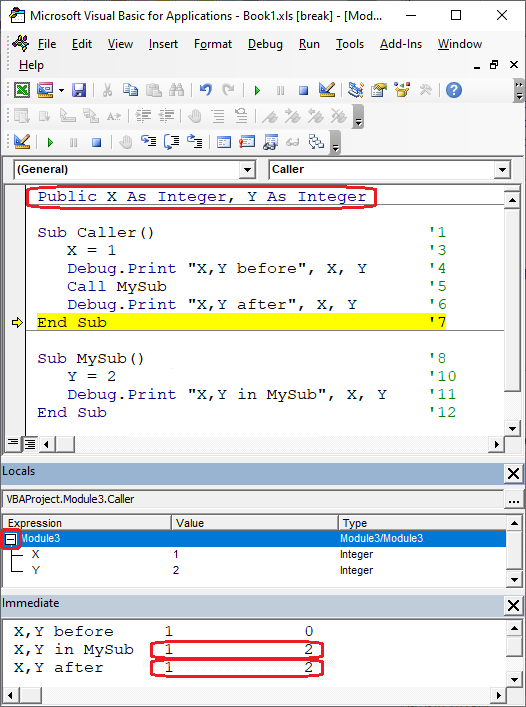
Conclusion: The scope of a variable declared at the module level is global. This can be very convenient if many procedures all need access to the same variable. However making a variable global is also dangerous and should be kept to a minimum. The reason is that if some procedure clobbers the variable (erroneously change its value), then finding the culprit can be difficult. (The less convenient alternative is to put the variable on the argument list of any procedure that requires it.)
Example 10: This example illustrates:
- what happens when local and global variables have the same name
- the benefits of using the Option Explicit statement
Refer to the picture at the end of the example and carry out the following steps:
- Create a new module (Module4) and paste this code into it:
Option Explicit                     '1
Public A1 As Integer                '2

Sub MySub()                         '3
   Dim A1 As Integer                '4

   A1 = 5                           '5
   Module4.A1 = 10                  '6
   Debug.Print "local", A1, _
   "global", Module4.A1             '7
End Sub                             '8
- Ignore line 1 for now. Notice that line 2 declares a global variable named A1 and line 4 declares a local variable, also named A1.
- Open the Immediate and Locals windows and clear the Immediate window's contents.
- Now we are ready to start stepping through the code. Click anywhere in the MySub subroutine and then click the Step Into button.
- Look at the Locals window. It shows the local variable A1. Click the ⊞ button to expand the tree, and now we see the global variable A1 as well.
- Line 5 sets the local variable A1 to 5 and line 6 sets the global A1 to 10.
Notice that the syntax
Module4.A1is required to refer to the global variable when a local variable with the same name exists. - Take a couple more steps until line 8 is highlighted. Execution is about to end. This is when the screenshot below was taken.

- Click the Reset button to stop execution.
- Now let's put a “bug” in the code. Change line 5 to read
AI = 5. This is a typo that is easy to miss, since 1 and I look so similar. - Try to run MySub now. We get the error message shown below. The reason is that the Option Explicit statement demands that we declare all variables, and the code contains the undeclared variable AI.

- Click the Reset button, then delete (or comment out) the Option Explicit statement, and then rerun the subroutine. This time Visual Basic is blissfully unaware of the error and produces the wrong results.
One final note: Line 7 shows how we can continue a long line of code across multiple lines: put an underscore character preceded by a space at the end of the line that you want to continue.
The Scope of Procedures
The scope of a procedure (a subroutine, function, macro or event handler) is defined as the parts of our code that are aware of the procedure's existence.
We use the declaration Public Sub or Public Function to indicate that the procedure is
accessible to all other procedures in all modules and sheets.
We use the declaration Private Sub or Private Function to indicate that the procedure is
accessible only to other procedures in the module or sheet where it is declared.
Note:
- If not explicitly specified, the default is that a procedure is Public.
- We have seen that when Visual Basic creates a stub for an event handler, it makes it Private. However we could change that to Public.
- We have seen that when we record a macro, its declaration is not specified as Private or Public. Therefore the scope is the default, Public.
- If a project is small, then we can put all our procedures into Sheet1 and never use any modules. Then there is no difference between Public and Private.
- If a project is large, then it is useful to put procedures into modules, organized by task. For example, in an algebra app, we might have one module containing procedures for factoring, and another module containing procedures for graphing.
- Important: If we want to be able to use a function in the cells of a spreadsheet then we must put it in a module and we must make it Public. We saw this in Example 7.
- Click here for more information on the scope of procedures.
If you would like to leave a comment or ask a question please send me an email!